 Welcome loyal GadgetGirl fans to my newest blog! This blog will focus entirely on educational technology as it relates to equity and inclusion for all. Ok, so the blog is for a class I am taking (Computer Applications in Special Education) but it ties in nicely with the premise of my original blog (GadgetGirl's Education 2.0).
 So, the first assignment for this class is called the $1 Design Challenge and it's all about simplicity. So, our task is to design a simple assistive technology device that actually does something and costs less than one dollar to make. The example given in class was that of a paper clip. Today, paper clips come in many different shapes, sizes and designs but the intent is the same - hold papers together. Like, curb cuts, the design is universal in that anyone can use it (and will likely use it) even for purposes other than it's original intent.
My assistive technology (or adaptive technology, as some call it - hence the name of this blog) is the Coat Lifter. I'm sure many of you can relate to the problem. You have a brand new mid-length or full-length coat and are excited to wear it. You go out to dinner with friends but the restaurant doesn't have a coat room. So, what do you do? You place the coat on the back of your chair and fret all night about how dirty the bottom must be getting or fear that it will keep tripping the waiter. The solution: The Coat Lifter!!!

Materials:
1 Rubber Band (Cost: $1.99 for a bag of 50. Each rubber band: $0.04)2 Magnets (Cost: $1.79 for a package of 6. Each magnet: $0.30)Krazy Glue (Cost: Nothing - I already had this at home)
Stickers (Cost: Nothing - I got these free in the mail with return address labels)
Total Cost: $0.64.
The Application:
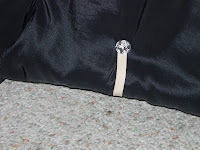
In this example, I used a raincoat with a split in the back to demonstrate the difference between the long side and the side using the Coat Lifter. Ideally, you would want to have more than one to lift up both sides of the coat. In all fairness, this invention would probably cost more than $1 in actual production if using stronger magnets and more flexible bands. But, buying the raw materials in bulk could actually bring the cost down again. |  |  |
To conclude, this assignment was fun and thought-provoking, providing insight into the idea of universal design, as well as universal design for learning.

View all these images on Picasa.

No comments:
Post a Comment